Monday 29 May 2017

AUTO COUNTER IN DYNAMICS 365

For Microsoft Dynamics CRM 4.0.0/2011/2013/2015/2016/ Dynamics 365 one of the major challenges faced by developers is generating Auto numbers on various entities. To overcome this, Soluzione IT services Microsoft Gold Partner releases “Solz Auto Counter”

solution to automate the process of adding counters to the CRM entities. It allows user to configure counter for default as well as custom entities. Here, you can put any prefix, suffix, counter zero padding and specified date formats with Auto numbering. You can set initial value of counter and its incremental value as well. At any point of time it can be activated or deactivated. You can also provide Security Role as per the user access in Dynamics CRM, it can be Read Only or Admin Access.

One can configure the Auto counter for “Dynamics 365”as per the example given below.
1.Install the SolzAutoCounter solution in Dynamics 365 by importing the managed solution. After it is successfully installed you should have SolzAutoCounter in your solutions as below.

2.Clicking on the Auto Counter to navigate the sub-grid.

3.Create a new auto counter record to configure the counter settings.


4.Go to Account entity and create a new record and save


Key Features

·         It allows user to use the auto counter in Microsoft dynamics 365 online or on-premises versions.
·         It allows user to configure the counter for Microsoft dynamics 365 default as well as custom entities.
·         Quick create to set auto counter for any entity.
You can use the following date formats to add as prefix or suffix of the counter
·       Use format “[d]” to Return only date
·       Use format “[m]” to Return only month
·       Use format “[y]” to Return only year
·       Use format “[ddd]” to Return Day First Three Letters
·       Use format “[dddd]” to Return Day Name
·       Use format “[mm]” to Return Month Number In Integer
·       Use format “[mmm]” to Return Month First Three Alphabets
·       Use format “[mmmm]” to Return Month Name
·       Use format “[y]” to Return Year Last Value
·       Use format “[yy]” to Return Year Last Two Value
·       Use format “[yy]” to Return Year Last Three Value
·       Use format “[yyyy]” to Return Year Last Four Value
·       Use format “[yyyyy]” to Return Year Last Five Value

Activate or deactivate counter at any time easily. This will activate or deactivate when the auto counter record is set to activate or deactivated status.

To Know More Visit
http://www.solzit.com/new-auto-counter-dynamics-365/
 or talk to our experts 


Friday 26 May 2017

Microsoft Dynamics 365 Development : Tips and Tricks

There are a lot of quick ways of doing things in Microsoft Dynamics 365 but developers struggle in finding how. Today I am going to explain how to call a workflow on a custom ribbon button.
Let’s say you have a situation, where you want to perform some operation on custom ribbon button on “click event”. Let us take an example. I have a button on OPPORTUNITY form called ‘ConfirmRequest’.On the click event of this button I have to generate an ORDER and also want to send an email. The best way to achieve this is by creating a workflow. Butthe issue is, how to call workflow on the button click.


Microsoft Dynamic Gold Partner,Dynamic 365,Dynamics 365 services,power BI ,gold partner,Dynamic 365,CRM services


There are many solutions posted on the web, that involve using JavaScript, web resources etc. however there is a much easier way that requires no coding.For this we use Ribbon Workbench. Contact us to find out the right plugin to download.

Here are the steps to follow:
  • Create a workflow, for example – I created a workflow called Generate Order from Opportunity.
  • Extract the GUID of this workflow with the help of advanced find. Here is how you do it:
  • Open advanced find window
  • Look for processes and search for your workflow name
Microsoft Dynamic Gold Partner,Dynamic 365,Dynamics 365 services,power BI ,gold partner,Dynamic 365,CRM Services,365,microsoft,crm,gp, outlook365,microsoft online,dynamic,power bi,salesforce,invoice template,office365,workflow,sharepoint,outlook mail,elizabeth warren,google.com,microsoft office,zoho,agile,portal,onenoteonline,sql,opportunity,visual studio code,visual studio 2017,.net framework,bootstrap table,march madness schedule,onenote,microsoft outlook,microsoft azure,visual studio,microsoft office 365,sql server,mail chimp,office 365,erp
  • Export to Excel and extract the GUID of the proceed from the column A called (Do Not Modify) Process.
  • Load the new solution into the Ribbon Workbench with OPPORTUNITY entity.
    Microsoft Dynamic Gold Partner,Dynamic 365,Dynamics 365 services,power BI ,gold partner,Dynamic 365,CRM Services,365,microsoft,crm,gp, outlook365,microsoft online,dynamic,power bi,salesforce,invoice template,office365,workflow,sharepoint,outlook mail,elizabeth warren,google.com,microsoft office,zoho,agile,portal,onenoteonline,sql,opportunity,visual studio code,visual studio 2017,.net framework,bootstrap table,march madness schedule,onenote,microsoft outlook,microsoft azure,visual studio,microsoft office 365,sql server,mail chimp,office 365,erp
  • Expand the commands, “Solution Elements” tab.
    ,Microsoft Dynamic Gold Partner,Dynamic 365,Dynamics 365 services,power BI ,gold partner,Dynamic 365,CRM Services,365,microsoft,crm,gp, outlook365,microsoft online,dynamic,power bi,salesforce,invoice template,office365,workflow,sharepoint,outlook mail,elizabeth warren,google.com,microsoft office,zoho,agile,portal,onenoteonline,sql,opportunity,visual studio code,visual studio 2017,.net framework,bootstrap table,march madness schedule,onenote,microsoft outlook,microsoft azure,visual studio,microsoft office 365,sql server,mail chimp,office 365,erp
  • Right-click on the Command of the custom button that you want to use. Example ‘CCSDP .opportunity.Generate Order.Command’ and select ‘Edit Actions’.
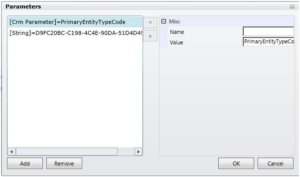
  • Add a JavaScript Command and set the following properties:
    Microsoft Dynamic Gold Partner,Dynamic 365,Dynamics 365 services,power BI ,gold partner,Dynamic 365,CRM Services,365,microsoft,crm,gp, outlook365,microsoft online,dynamic,power bi,salesforce,invoice template,office365,workflow,sharepoint,outlook mail,elizabeth warren,google.com,microsoft office,zoho,agile,portal,onenoteonline,sql,opportunity,visual studio code,visual studio 2017,.net framework,bootstrap table,march madness schedule,onenote,microsoft outlook,microsoft azure,visual studio,microsoft office 365,sql server,mail chimp,office 365,erp
  • Click on OK. And publish it.The workflow will start getting called from the click of the custom button.
  • Congratulations!!! Now you know how to call workflow from a Custom Ribbon button on Microsoft Dynamics 365.

To Know More visit 
http://www.solzit.com/dynamics-crm-development-tips-and-tricks-calling-a-workflow-from-ribbon-button/ or talk to our experts http://www.solzit.com/